
For more in-depth information on these topics, please view the video tutorial segments in the boxes below.
The "Info" tab in the right panel of your Zotero library contains all of the automatically imported metadata from your article, book chapter, or other resource. This is the information that is used to create citations and bibliographies. For this reason, it is important that the information in this panel is accurate. You may edit this information. Click here for more information.
The information from this page is adapted from Zotero's documentation page: https://www.zotero.org/support/collections_and_tags
Saved items are in your Zotero Library. An example is shown below:

The left panel shows the root library ("My collection") and folders or collections. The middle panel shows saved articles. The right panel shows detailed information for any selected item. The content under the "info" tab is information imported when the item is added to your library. Notes, tags, and related tabs, also under the right panel, are areas that you customize to organize your collection. The tag selector, shown in the bottom left corner, shows tags automatically assigned to all of the resources in your collection.
The Zotero Collections Model
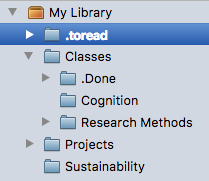
In Zotero, the root library, or "My Library" is where files are stored. When a resource is copied into a collection, it will remain in the root library unless you delete it from that collection.
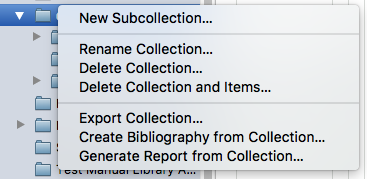
Click the “New Collection…” button (![]() ) above the left pane in Zotero to add a new collection (folder). You can also right-click (PC) or Control-click (Mac) on “My Library” or the name of a Group library and choose “New Collection…” to add a new collection. The new collection will appear as a folder under “My Library” or the selected Group library.
) above the left pane in Zotero to add a new collection (folder). You can also right-click (PC) or Control-click (Mac) on “My Library” or the name of a Group library and choose “New Collection…” to add a new collection. The new collection will appear as a folder under “My Library” or the selected Group library.
Subcollections can be created by dragging and dropping an existing collection onto another collection or by right-clicking a collection and choosing “New Subcollection…”. You can convert a subcollection into a top-level collection by dragging it out of the collection and dropping it into empty space in the left Zotero pane.
You can drag collections between Zotero libraries in the left pane. If you have editing privileges for the destination library, the collection (and all of its items and subcollections) will be added to the destination library.
To save an item directly into a specific collection, simply select that collection (remember that Zotero must be opened to save) and click the Zotero save icon.
Items can be moved in and out of collections by dragging and dropping them into the desired collection.
Right-click (Windows) or control-click (Mac)on the collection and choose “Rename Collection…” to give a collection a new name. Collections are sorted alphabetically in your library. You can use punctuation marks to sort collections to the top of the list.
Notes
To create a note which belongs to a specific item, select an item in the center pane. Then, either click the “New Note” button at the top of the center pane ( ) and select “Add Child Note”, or go to the “Notes” tab in the right-hand pane and click the “Add” button. You can also right-click an item and select “Add Note”.
A note will be created as an attachment to the item (it will also show up under the “Notes” tab), and a note editor will appear in the right-hand pane. You can create a dedicated window for the note editor by clicking the “Edit in a separate window” button at the bottom of the editor. Text in notes is saved as you type.
Click here for more information about notes.
When items are saved to a Zotero library using the Zotero Browser Connector, tags are sometimes automatically added to items. For example, OPAC library catalogs provide subject headings for their records, which are saved as Zotero tags. Automatic tags behave the same as manually added tags but are marked by a red icon in the “Tags” tab of the right-hand Zotero pane (versus the blue icon for regular tags).
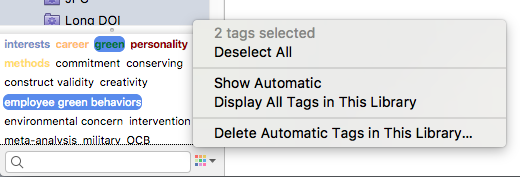
Automatic tags can be hidden from the tag selector by clicking the multi-color button in the lower-right corner of the tag selector and unchecking “Show Automatic”. You can delete all automatic tags from a library by clicking “Delete Automatic Tags in This Library”. To prevent Zotero from adding automatic tags, uncheck “Automatically tag items with keywords and subject headings” in the General pane of Zotero preferences.
To add a tag to an item, select the item in the center Zotero pane, then click the “Tags” tab in the right-hand pane. Click the “Add” button, type the tag name, and type Enter/Return. You can rename a tag by clicking on it and typing the new name. Delete tags using the minus “–” button. Once you have added the tag it will also appear in the tag selector in the left pane.
As you type, you will be shown a list of matching existing tags. Choose a suggested tag using the up and down arrow keys and insert it by typing Tab or Enter/Return.
You can also drag selected items to a tag in the tag selector in the left pane to quickly add the tag to all selected items.

For more detailed on tags, including color tags, please click here.
The tag selector is located at the bottom of the left Zotero pane. It shows all the tags that have been assigned to the items currently shown in the center pane (i.e., items in the currently selected collection that match the current search). To show all of the tags present in the library, click the multi-color button in the lower-right corner of the tag selection and choose “Display All Tags in This Library”. Tags not assigned to currently shown items are grayed out. You can filter items by their tags by clicking on one more tags in the tag selector. Only items that have all of the selected tags will be shown in the center pane. As you apply filters, the list of tags in the tag selector will be updated to show only the tags assigned to currently visible items. Clicking on a tag a again will deselect it. To deselect all tags at once, click the multi-color button and choose “Deselect All”.
The filter box at the bottom of the tag selector can be used to search for tags. Type in the search box to see all tags that match. To go back to viewing all the tags in the collection, press the Escape key or click the “X” button on the right.
In addition to collections and tags, a third way to express relationships between items is by setting up “relations”. Relations can set up between any pair of items in a library (it is not possible to relate items from different libraries).
To create a relation, select an item in the center pane and go to the “Related” tab of the right pane. Click the “Add” button, and select one or more items from the same library in the pop-up window (hold down Ctrl or Shift [Windows/Linux] or Cmd or Shift [Mac] to select multiple items) and click “OK”. The selected items will now show up as related items in the “Related” tab, and clicking an item will take you straight to that item.